Japanese Garden Lanterns
 |
| Japanese Garden Lantern |
[Visual Comm project based on April's art masterpiece]
The garden lantern, by itself, looks like a sculptured showpiece that acts as one of the focal points of the literal garden. The soft, luminous light that radiates out of these enchanting lanterns brings about a sense of peace, shedding just enough light for the visitor to make his way through the garden while appreciating its beauty.
In John Singer Sargent's masterpiece [Click here for post], we saw the white-gowned young girls lighting their Japanese garden lanterns at dusk. To bring this masterpiece even more meaning, we can introduce young students to a very satisfying and simple project they will surely enjoy. Almost all little ones enjoy painting with watercolors. They can splash away with this fun media and create a lantern to be treasured forever.
 | ||||
Here is what you will need:
White tissue paper1 piece white card stock scissors glue stick clear tape watercolors & brushes water cup for rinsing brushes paper towel tea light one empty jelly jar (soak in hot soapy water to remove label.) |
 |
1. First prepare the jelly jars & tissue by lying the jar on its side on a piece of white tissue and cutting a rectangle the height of the jar.
|
3. Pass out the card stock. I find it helpful to keep a step-by-step sample of everything I do so the students can see each step. You may wish to show 1st/2nd graders how to use the brush to make a "swiggly" line branch by pressing the brush firmly at the base of the branch and lifting the brush as you go creating a thinner line at the tip of the branch. Add red watercolor "dots" as brush marks for cherry blossoms. Some students want theirs to look like the sample. Other students would rather just do their own thing, and a lamp filled with swashes of color is all you really need! They can explore their inner artist and slosh until their heart is content!


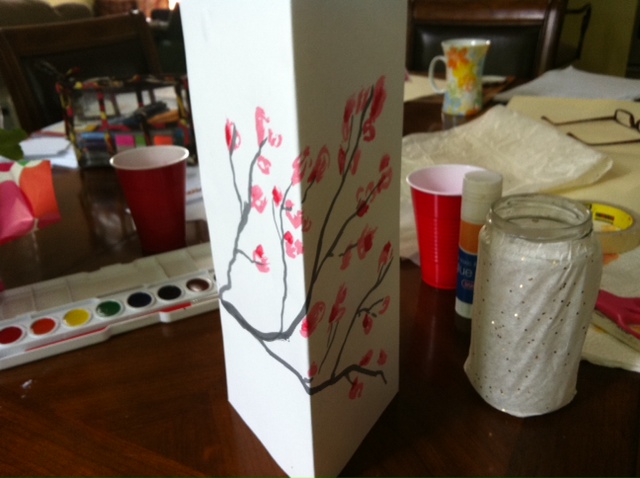 | |||
4. Fold the 8.5 X 11 painted card stock in half long ways (hot-dog style!)
|
 |
| 5. Cut from the fold to about 1.5 inches from the top in strips about 1 inch thick. |
 |
6. Unfold the paper and bring it around the jar. Add a piece of tape inside the paper to hold the shape of your "shade." Remove the shade and finish gluing and/or taping the shade into a circular shape that will fit over the jar.
|
 |
| The shade slips easily over the jar and is now ready for the tea light. |
 |
Naturally, for the K-2 classroom, you will not light the tea light, but can send it home as a lovely gift, especially with Mother's day coming up! Here's an idea of how to light the tea light and then push it down into the bottom of the jar once it's lit. Otherwise, a long-handled lighter can be used.
|
 |
| What a gorgeous way to enjoy your young students artwork! |
I hope you have enjoyed this project. It is sure to bring out our student's inner artist with the sloshy water colors and light up the face of mom! It is engaging and a great way to draw our students to the application of these Japanese garden lanterns in this classic masterpiece of John Singer Sargent - Carnation, Lily, Lily, Rose!
For a deeper look at this Sargent's magnificent painting, CLICK HERE
Labels: Art Appreciation, Theme: Gardens, Visual Comm
posted by Laura Bird Miller @ 12:00 AM
0 Comments
![]()

0 Comments:
Post a Comment
We sincerely thank you for taking the time to respond. You are an encouragement to the Fireflies Team.
Subscribe to Post Comments [Atom]
<< Home