Fireflies         

Nov 22, 2012

Visual Comm: Turkey Treasures

Turkey Treasures - buried beneath the holiday napkin aer nuts and candies but you could fill with slips of paper for you guests to play charades, read Bible verses, or fill with hings you are thankful for, etc.!

Happy Thanksgiving!  Here is a sweet turkey to make with your little one.  We made these in pur Circle Christian School art classes and the students enjoyed not only constructing them, but the thought of surprising everyone with the treasures inside.

You will need:
  • brown paper lunch bag
  • red, orange, yellow, brown, black, white construction paper
  • one sheet of yellow foam, cut into triangles for beak
  • red chenille for gobbler
  • googly eyes
  • paste (works best for classroom), glue sticks, or hot glue
  • wooden popsicle sticks (optional but helps with the stability of the turkey)
Fold a sheet (or a half sheet for small hands!) of red, orange, and yellow construction paper in half.  Trace one of the child's hands onto the each sheet.  Cut out the hand prints so you will have 6 hand prints.  Arrange as: red, orange, yellow, red, orange, yellow, and fan them into tail feathers.  Staple at the base so the feather stay together.  Set aside.


Cut brown paper lunch bag about halfway down so it is not too tall.  Paste tail feathers onto the back side of the paper bag while it is shut and set aside.

For the front of the bag, make a bowling ball shape on brown construction paper for the body.  Add a pilgrim hat, googly eyes, yellow foam beak (which we put two triangles together so it was dimensional and looked like he was saying what was on our signage, "Happy Thanksgiving!)  For the signage, simply make a white rectangle, frame with a larger black rectangle and write whatever your child wants on it, whether it's Happy Thanksgiving and the year or just their name if they can write it!  Encourage your child to put his his "mark" on it in some small way.

Paste the turkey on the front side of the bag after he is all assembled.  If you cut your bag too short or just for stability, you may wish to put a popsicle stick behind the turkey as you can see in the photo above (bottom right corner.)

Open bag and line with a pretty holiday napkin.  Fill with treasures whether they be candies, nuts, rolls, slips of paper with Bible verses, charade topics, conversation starters, a gift for Grandma, etc!

God bless you and your family and thank you for sharing with us!
Circle Christian School students so happy to show their Turkey Treasures!


Love to you and yours,
Laura Bird Miller
Artist/Art Instructor


Labels: ,

Nov 19, 2012

November Masterpieces: Henry Bacon and Jennie Brownscombe

Landing of the Pilgrims 
by Henry A. Bacon, 1877, oil on canvas


Can you image what it would be like to land on the shores of a new land, far from your home, with no cell phone, little food, no shelter, no heat, indoor plumbing, or air conditioning, with no idea where in the world you were?  How would you feel?  Excited?  Scared?  Cold?  Lonely?  Surviving a very rough boat trip and experiencing a very challenging first winter, the Pilgrims' story of courage and perseverance inspires American hearts and is an important part of our heritage. 
The First Thanksgiving, Plymouth,
Jennie Augusta Brownscombe,
1914, oil on canvas

The Pilgrim's First Thanksgiving of 1621 at Plymouth is not recorded with photos; however, this painting by Jennie Brownscombe painted in 1914, 300 years since that major event, is a beautiful and historic reminder of the Pilgrim's story, God's grace, and the importance of thankfulness.

Young students are used to colorful animations, cartoon drawings, and perky graphics. Here are some questions and activities to get them engaged with these historic paintings:

1.   How would you feel if you arrived in a new land with no phone, air conditioning or heat, running water, bathroom facilities, house, job, food? (Answers will vary.)

2.  Notice the colors in these photos.  What colors do you see?  Are they bright or dreary?  Do you think they reflect how the Pilgrims felt?  (Neutral colors, greys, blues, browns, golds, greens.  The colors are drab and somewhat dreary, perhaps reflecting the somber tone of the paintings.  The top painting is a little brighter, showing expectancy with formality.)

 3.  Do you think the Pilgrims/Pilgrim children in these paintings were scared? What do you do when you are scared? (Hide, pray, run to parents, cry, freeze, etc.)  Draw something you are afraid of. (Notice the colors they use and what they are trying to communicate.  Art is a powerful tool that can help children express their thoughts and emotions long before they can fully express themselves with words.)

 4.  In the first painting, we feel a sense of movement along with the feeling of expectancy with formality.  The oars are up, and the young girl, Mary Chilton, is getting off the boat.  You can almost feel the cold wind and the boat rocking with the waves against the rocks!  In the second painting, we feel a sense of stillness and reverence as everyone is still and praying.  Even though the color schemes are similar giving a tone of somberness, one painting shows movement and the other shows stillness. Which painting do you like better?   Why?

Relax and watch your little ones engage with you through these important historical paintings as you dig deeper with them!  Your engagement with the paintings and curiosity about the masterpieces and their subject matter will be contagious.  They take their cues from us as their teachers, parents, authorities, so if you get excited about the Pilgrims and this elegant historic art, they will too!  I hope it is meaningful to you and yours.  And, by the way, happy thanksgiving; I am so grateful for you readers!  Blessings to you and yours, and stay tuned for our super-fun masterpiece connection/response activity in our next post!

Love,
Laura Bird Miller
Artist/K-12 art instructor
Orlando, Florida

Laura Bird Miller - http://wwwfacebook.com/laurabirdart


Labels: ,

Nov 16, 2012

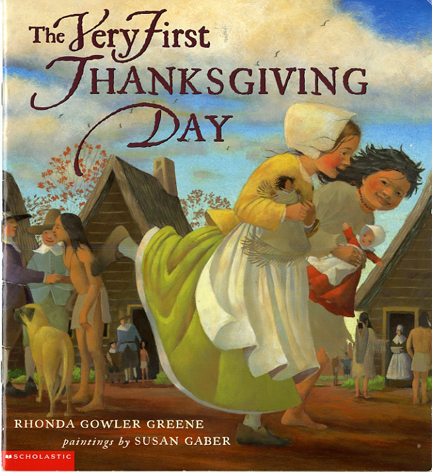
CLIP Review: The Very First Thanksgiving Day

Author:  Rhonda Gowler Greene
Illustrator:  Susan Gaber


This is the food, 
gathered and blessed,
the corn and sweet berries,
the wild turkey dressed, 
shared on the very first Thanksgiving Day.

But where did the corn and berries come from? Who planted them? How were the turkeys caught? Who shared the first Thanksgiving? What a perfect time of year to find books that answer these questions and read them with your children. Here's a great one to get you started! 

The paintings in this book are colorful enough to delight young readers while maintaining attention to historical detail. The author's and illustrator's notes at the beginning of the book lay the foundation for the simple text which follows. Once you read those, you will "see" much more detail within the story as you read. For instance, in learning that the Pilgrims brought two dogs, a mastiff and a spaniel, with them on the Mayflower, the illustrator has painted them within several illustrations. How many times can you find them?

            These are the Pilgrims who farmed the new land,
            Who steadfastly labored and toiled by hand,
            and learned from the Indians, skillful and strong.

May we never be too proud to realize that others may have skills that we may need. All of us have something to offer others and we can all learn from one another.

Mary Byrne Kline

Labels: ,

Nov 15, 2012

Fireflies Presents: "T is for Thanksgiving"


T is for Thanksgiving

Welcome to Fireflies Presents…

It is my hope that the ideas we share will be the spark that motivates you to intentionally celebrate your family; your children.  These memories are designed to be created in your family room, around a puppet theater, with the smell of fresh popcorn wafting from the kitchen.

We have written the Fireflies Presents content for one or more children between the ages of 3 – 6. There is a lot of parent involvement and very little preparation or practice needed on the part of the child(ren).   We kept it simple…promise!  We have provided everything you need including the puppets (no cutting or coloring).
Our turkey puppet - just print out, fold, glue to a dowel and put on a show!


What is a Fireflies Presents Family Night?

Fireflies Presents celebrates the imagination and creativity of what it means to be a child and it begins with a theme and a ticket.

This month the theme is thankfulness:  "T is for Thanksgiving".
1.     Select an evening for family and friends to gather and pass out tickets as a reminder.  Make your popcorn cones!  (template provided)


On the evening of Fireflies Presents…

2.     Children collect the tickets at the front door.  
Watch your child’s face light up as they realize they are a part of something very special; something that requires a real ticket!


3.     Every person attending is then given a program & popcorn cone that has been decorated based on the theme.   You may want to keep a large bowl filled with popcorn so that guests can refill as needed.  The stars of the show sometimes need a popcorn break before the show...


4.     Guests take their seats in chairs that are lined up in front of a doorway or opening that holds the Fireflies Presents puppet theater.

5.     SHOWTIME!   Fireflies Presents…  "T is for Thanksgiving"


Welcome to our show!!

The Turkey Poem "Gobble - Gobble"!


"On Thanksgiving Day"


Family Read Aloud Time
The First Thanksgiving Day


Psalm 100:4


Take a bow!


6.     Applause and Autographs!  Even if your child can only make a mark for their signature, ask for their signature.  Imagine how special that “mark” will be in 20 years.   That means you have to keep each Fireflies Presents program!


7.     Reception: Serve refreshments that correspond with the theme of the evening.  Don't worry, we've even supplied the recipes.  

All the information you need to enjoy a Fireflies Presents evening during Thanksgiving is included on our website.  Chick here:

Sorry, but this script is no longer available.  Scripts are posted for two weeks only.


Please feel free to create your own unique family event by using these ideas merely as suggestions.   

Thank you for joining us on this journey to create precious family memories and develop communication skills while experiencing the best in children’s literature.
                     
Deepest Blessings,   
Deni Corbett

Labels: ,

Nov 12, 2012

Print Comm: Thanks for Thanksgiving

Author:  Julie Markes
Illustrator:  Doris Barrette
Age:  2 - 5 year olds
[Print Communications]

Writing down the many reasons we have to be thankful is a great way to celebrate Thanksgiving and introduce young children the importance of communicating gratitude.

I found this book last year and wove it into our family Thanksgiving traditions.  Now that we had grandchildren, I wanted some way to catalog our blessings each year.   Before dinner we read Thanks for Thanksgiving by Julie Markes.  It is wonderfully illustrated and a quick read, simply listing things to be thankful for, from the turkey on the table to warm, cozy cuddles.  The best blessing of all?  Being together as a family.


The last two pages are designed as a place for each family member to write down blessings for which they are thankful.  From our youngest grandchild who said he was thankful for "moon" to Great Grandpa Corbett who wrote, "I am grateful for the peace God has given me during our recent health concerns." each of us journaled our thanks to God for His provision and blessings in 2011.   

I just unpacked this special book for Thanksgiving Dinner 2012 and already know what I'm going to write this year.  "Thank you heavenly Father for the two precious additions to our family this year, Ryder Joel and Caroline Elizabeth!  Thank you for undeserved favor."  

Why not consider adding Thanks for Thanksgiving to your home library and begin a new Thanksgiving tradition of written gratitude?

Labels: ,

Nov 7, 2012

Thanksgiving Treats to "gobble, gobble" up!

I love Thanksgiving.  There's an incredible emotion surrounding this event as family and friends gather and reflect on the blessings God has bestowed on each and every one of us.  

Growing up, I can remember waking up to the smell of homemade crescent rolls in the oven, the Macy's Thanksgiving Day parade on TV and a day spent with those that meant the most to us.  My Mom and I would spend hours in the kitchen, covered in flour, working out all the small details and chatting.  These memories are incredibly precious to me as an adult.

The food ideas below are intended to be projects that encourage time spent with your little ones.  Any project can be used to talk about the blessings that are especially important to you or the things that your children are most grateful for.  The cornucopia and Pilgrim hats below can encourage conversation about the origins of this holiday.
Acorns and Turkey

Candy Turkeys

My Mom and I have been making these candy turkeys for years and my boys love them just as much as I did as a little girl.  They are quick to make and look darling sitting on plates with place cards.

Items needed:
  • Caramel Squares - I used Trader Joe's Fleur-de-Sel Caramels but found them VERY soft to work with.  You may be better off with the regular grocery store variety.
  • Fudge Striped Cookies 
  • Hershey's Kisses
  • Candy Corn
  • Edible Food marker

Turkey overlooking the manufacturing area.
Lay a cookie, fudge stripes up on to the counter.  Make sure to have an unwrapped Hershey's kiss and a candy corn ready to go nearby.  Place the caramel square for a few seconds in the microwave until it has just barely softened, 10 seconds or less for the caramels I used.  If you warm them too long, you'll end up with a big puddle of gooey mess in the microwave and more than likely it will scorch and make your whole house smell.  Take my word for it, keep your eyes on those little caramels and don't leave them in there.  I speak from experience.

Remove the caramel square and lay onto the cookie, press the Hershey's Kiss into the bottom of the caramel to form his feet and press the candy corn into the top forming his beak.  Try to make sure that the kiss is positioned so that the turkey will stand up straight.  After the caramel set up, add two little black eyes with an edible food writer.  If you don't have one of these, you should get one.  These food writers work on bread, hardboiled egg shells, and banana peels to name a few and kids love having messages and pictures on their lunch and snack items.

Gobble, gobble!

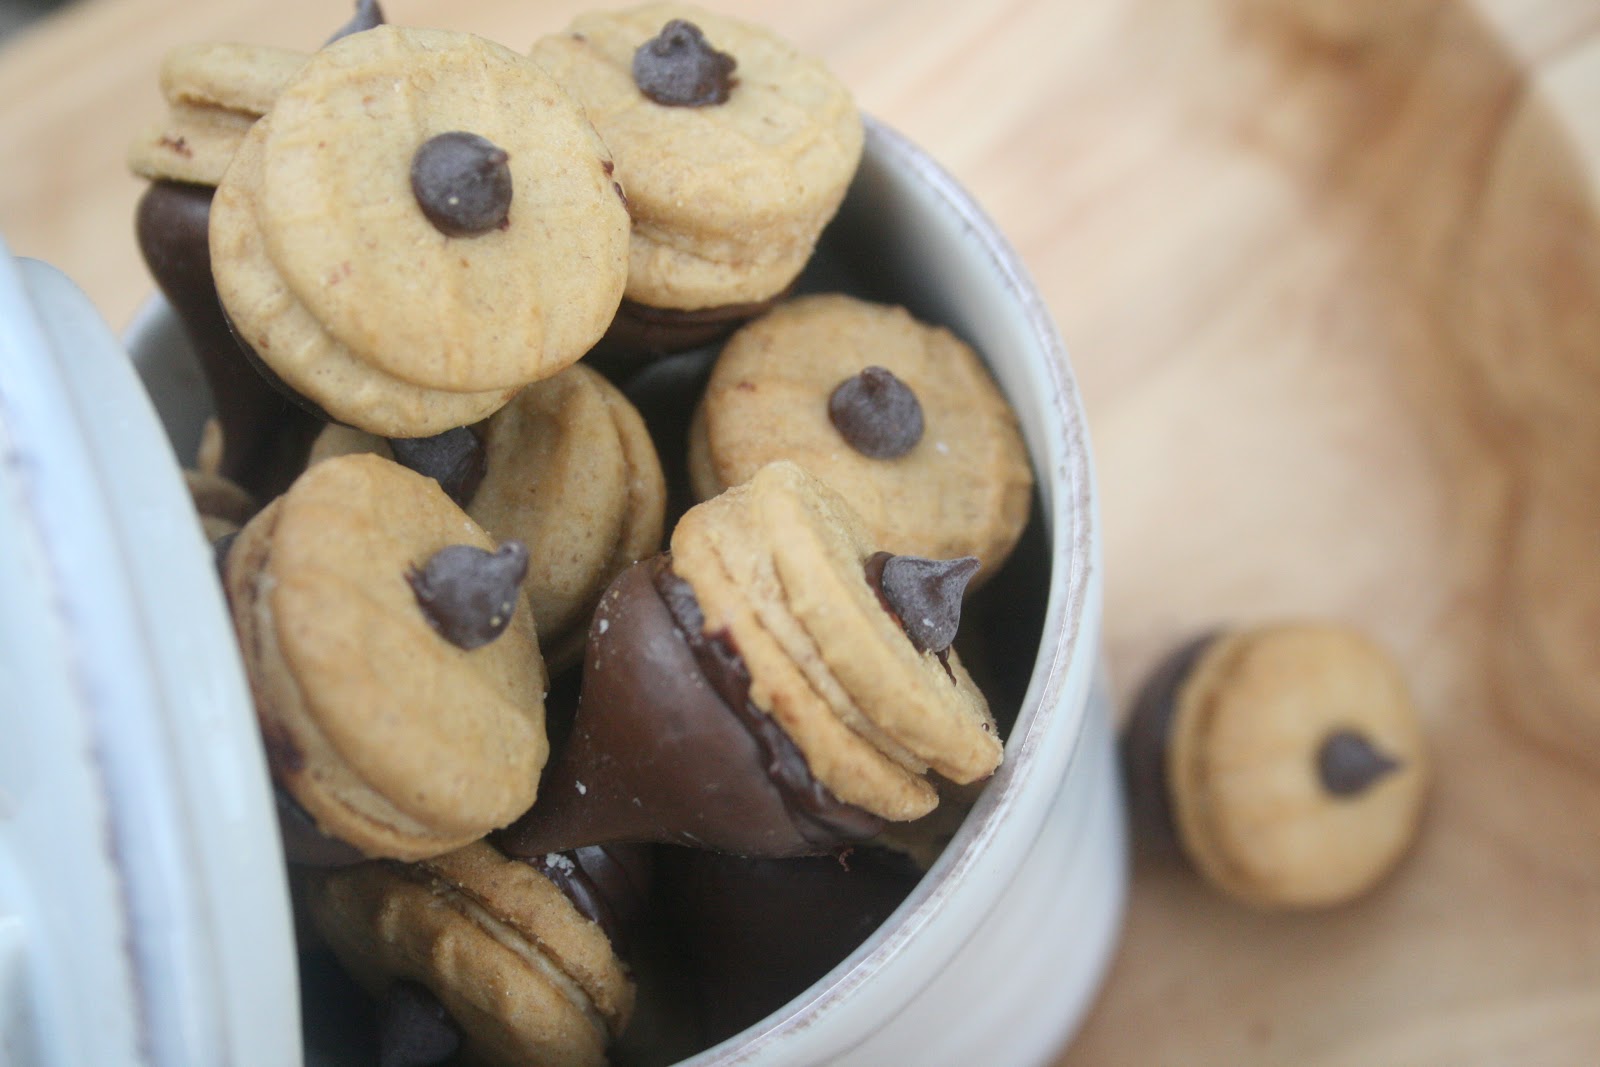
Acorn Treats


Items needed:
  • Mini Nutter Butter Cookies (or mini vanilla wafers)
  • Hershey's Kiss
  • Mini Chocolate Chips
My assistant, Noah will be demonstrating how to make these fun little "acorns".


Chef Noah:  "First you have to unwrap all the Hershey's Kisses.  Its best if you eat the ones with the broken tops."

Mom's note: Eating all the ones with broken tops is not necessary and not recommended.  

Chef Noah:  "Have your Mom melt some chocolate chips in the microwave."

Mom's note:  A few chips in the microwave for 10 - 15 seconds or just soft enough to use as "glue" for the project.


Chef Noah:  "Dip the big part of the Kiss into the melted chocolate and then squish it on the cookie."

Chef Noah:  "After it dries, flip it on its side, and stick a baby kiss on the top."


The acorns, by the way, look adorable in a little treat bag tied with some raffia.  A perfect way to share your treats with neighbors and friends.


Ice Cream Cone Cornucopias

These look adorable but Mom has to do most of the steps and the little guys just got to put the candy in at the end.

Bring 1 - 2 inches of water to a boil in a large pot with a steamer basket set in the bottom.  Just make sure that the water line doesn't go above the holes in the steamer basket or you'll have soggy cones on your hands.

Place 2 ice cream cones in the steamer basket and steam until the ends have softened.

Remove from the pot and bend end of cone up and around a pen/ pencil to make "horn" shape.

After they cool, they can be filled with mixed nuts, Chex Mix, or  assorted candies.
Completed Cornucopia

Marshmallow Pilgrim Hats

 Items Needed;
  • Fudge Striped Cookies
  • Marshmallows
  • Chocolate for Dipping (we used Ghiradelli's)
  • Candy Corn
Following manufacturer's directions, melt chocolate in the microwave.  Using a deep bowl makes it easier since you can completely submerge the marshmallow.

I used a fondu fork, inserted it through the middle of the cookie (fudge cookie side towards the marshmallow) and into the marshmallow.  Dip the marshmallow in chocolate until thoroughly covered.  Tap off excess chocolate.


Slide the cookie up towards the marshmallow and pull the fondu fork out of the marshmallow.

Place on wax paper to set up.


Cut a small bit of the yellow portion of a candy corn off and use the food writer to make a small black rectangle in the center to create the "buckle".

Stick the "buckle" onto the melted chocolate and let them dry completely.

Cornucopias and pilgrim hats
And there you have it!  Four different treats for you and your kids to make this Thanksgiving.  May God richly bless your time with your little loved ones throughout this holiday season and I pray that you make memories that will last a lifetime.
Rachel Skavil
Fondant Flinger

Labels: ,